Showing posts with label Game Report. Show all posts

Friday, 11 May 2018

The Clouds Burst, Part 2

Well that last Post was a bit long-winded!

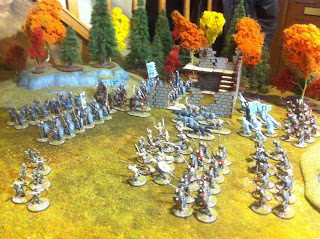
So let's move on to Scenario 2- in this, the Free Folk have fallen back towards the lower slopes of Erebor as the armies of Bolg pursue them. This game was played across the table diagonally, with the Gates of Erebor off-table to the Free Folk's left and the lower slopes behind them.

Serried ranks of spearmen- Dwarf, Elf and Man alike- presented a wall of glittering points towards the enemy. Unperturbed, the forces of Evil came on in a great rush- accompanied by a Troll!

Rather predictably, there wasn't too much manoeuver from the Free Folk in the early game as they assumed their Wall of Spears in the centre and on the left, while Mirkwood Archers stood on the right with arrows nocked...
The Goblins charged forwards en masse, with the Troll lumbering up behind them and Wargs once more prowling on the flanks.

*The Free Folk nervously stare down the onrushing horde...

With the distance closing, white-fletched Elven arrows began to fall amongst the packed ranks of Goblins and casualties began to mount- one Unit of cowardly scum even fled in tatters before the deadly rain of Elf-Shot! This had the effect of driving the bulk of the Evil force away from the Elves- straight towards the Dwarves on the left flank...

At that moment, a great cry of horror went up as yet more Goblins suddenly appeared behind the Free Folk, clambering over and down the lower slopes of Erebor to catch the defenders in a deadly pincer move!

*It's a trap!
 

Denied any targets, the Elven Archers now turned smoothly and let fly at the ambushing Goblins- once again they proved deadly accurate, and countless foul creatures tumbled from their vantage point with despairing cries- the remainder routing in panic. Under cover of this lethal bow-fire, the Elven Spearmen marched up to confront the surviving Goblin ambushers as they descended.

Meanwhile, a few desultory skirmishes were fought on the left- the Goblins and Wargs had the worst of it, but even so many brave Dwarves would never see the Iron Hills again. Repeated waves of attackers battered the Dwarven lines relentlessly, as the forces of Evil played for time and the Troll loomed ever-closer...

*Can the Dwarves kill enough Goblins before the Troll reaches them? Errr...

A great groan of dismay went up from the Free Folk as once again the relentless pressure of Goblin wave attacks bore fruit as the Dwarf Warriors on the left collapsed and were over-run by howling Wargs, which began to rampage through the backline, hoping to link up with the Goblins coming down the mountainside. The spear-armed Dwarves finally managed to destroy the Goblins they were facing but it was too late, as the ominous shadow of the Troll fell across them...

When things seemed to be at their bleakest, another shout rose above the din of battle- this time accompanied by the thunder of falling masonry as Thorin, the King Under the Mountain and his Company sallied forth! Smashing into the Goblin ambushers like a thunderbolt, they trampled the surprised creatures and continued on into the Wargs prowling the rear of the Free Folk lines. Wiping dark blood from their weapons, and mourning the loss of Bombur, Bofur, Bifur, Nori, Dori, and Nori they turned to face the Troll as it enthusiastically tore through the beleaguered Dwarf Spears...

*...And cue the dramatic theme music- Thorin takes charge of the situation!

But the sixth Battle Turn had now ended (and it was getting late!), so it was time to determine the winner of the Scenario- though they had blunted the Goblin attack, the Free Folk had fewer surviving Units in play and so the Shadow was once again triumphant- though only just!

Next week will see us play the final Scenario, as the ragged survivors of the Free Folk confront Bolg and his minions- will Beorn and the Eagles turn up in time? Will we be able to squeak a Pyrrhic Victory by killing the Goblin King? With my dice rolling, who knows!..

The Clouds Burst, Part 1

Last night, I finally got to use my Battle of Five Armies collection in a game- two games, in fact! In a happy coincidence we had five players- Tony and Tom would command the Wargs and Goblins respectively, while myself, John and Andy would take control of the Dwarves, Elves and Humans; with control of Gandalf being shared between us!

As I've mentioned briefly before, I had decided to break the events of the Battle into three Scenarios- each game would represent a smaller 'snapshot' of the larger struggle, and so a little 'Gamer's Licence' has been used! In general though, I hoped to represent the broad storyline of the conflict.

Before going any further, I will admit that I love the Dragon Rampant rules. They are quick to pick up and their unpredictability makes for some nice narrative moments. They allow you to be creative in the Units you field, and it's 'large skirmish' scale means you don't need to paint hundreds of models- for someone who gets easily distracted from one project to another, this is a real plus!
Some will say it's not suited to larger battles, but with a little bit of imagination and flexibility I think they can still serve you well...

Having said that, a few changes were made for these Scenarios-
  • Battle Turns. Because these Scenarios called for certain events to happen at certain times, or to have a set time limit, we split each into 6 Battle Turns. In each Battle Turn, each side would get a Player Turn.

  • Proximity. We prefer a 1" minimum distance between Units as opposed to the usual 3". We also allow friendly Units to pass through one another, as long as neither is Battered.

  • Command Chits. In DR, failing to order a Unit ends your Turn immediately. This can be a little too random for some, so we decided that each side would roll a D6 at the start of every Battle Turn to determine how many Command Chits they would receive:                                   1 = No Chits, 2-5 = one Chit, 6 = two Chits. Each Chit was basically an 'extra life' that allowed you to maintain the initiative following a failed Activation Test.
SCENARIO ONE.
The Elves, Men and Dwarves face off against each other while Gandalf (Bilbo in tow) strides between the rival forces and tries to defuse the situation! Meanwhile, the forces of Evil pour onto the battlefield, catching the Free Folk unprepared...

*The set-up. Bickering Free Folk on the left and the hordes of Shadow on the right!
 

Evil went first, and the hordes of Goblins charged across the plain- meanwhile the Wargs held back a little and attempted to outflank the Elves. The Free Folk desperately tried to pull back into a battle-line, but the confusion caused by the sudden arrival of the ravening hordes meant they were slow to do so (all their Activation Tests suffered a -1 penalty in the first Battle Turn!).

The Bowmen of Esgaroth abandoned the rocky hill and fell back towards Gandalf. On their right flank, the Esgaroth Warriors formed up into a Wall of Spears just in time- the first wave of Goblins crashed into them, while the Elven Spearmen behind failed to Activate and stood watching the carnage as the Men repulsed the Goblins at terrible cost; only to be pounced upon by a pack of Wargs! Battered by this experience, the Men fell back with their defensive formation in tatters!

Meanwhile on our left flank, the Dwarf Warriors caught another mob of Goblins as they rounded the hill- great slaughter was inflicted on both sides (mainly because my dice rolling was so bad!), and their long hatred for one another saw both Units wiped out (In actual fact, both Units failed their Courage Tests and Routed, but our explanation is much more heroic)!
Our left flank was now wide open, but thankfully only a few Goblin Archers were now present there and seemed reluctant to exploit the hole in our defences...

As yet more Goblins crested the hill and poured down into the valley, the Elves finally woke up and heroically interposed themselves between the onrushing hordes of Evil and the ragged Men of Esgaroth. Repulsing the Wargs harrying the retreating Men, they assumed a Wall of Spears in time to blunt another Goblin attack- routing the cowardly curs in a flurry of leaf-shaped spear-tips!

*At the height of the fighting- the Free Folk are hard-pressed on all sides!

Nearby, Gandalf raised a hand and lightning flashed across the battlefield! It struck a mob of Goblins and caused terrible casualties, but somehow the fiends continued their rush and caught the Bowmen of Esgaroth. Despite the deaths of many comrades, the Men fell back Battered but unbowed.
Shrieking in fury, the Goblins charged again and this time the Bowmen were cut down where they stood! As another wave of Goblins crested the hill, Gandalf's magic once again struck the Bowmen's killers and routed them- the craven survivors scurrying back to their lairs, now shrieking in terror!

*The Elves and Men stand together as it appears the forces of Evil are faltering...

Meanwhile the Elves and surviving Men formed a wedge of bristling spear-points to meet the fresh Goblins coming down the hill, their grim resolve also keeping the circling Wargs at bay.
At the last moment the Goblins changed direction as if driven by some dark will and started heading towards Gandalf, who looked a little exposed as he stood with Bilbo peering from behind the Wizard's cloak... Taking advantage of the confusion, the Wargs saw their opportunity and pounced on the Men of Esgaroth, having circled around the Mirkwood Spears while their pack-mates kept the Elves occupied to their front. The screams of dying Men were soon silenced by the triumphant howling of wolves!

*Things look grim for the Grey Pilgrim...

With that last combat, the sixth Battle Turn ended and with it the Scenario- incredibly close, but Evil had won a narrow victory as the Free Folk fell back towards Erebor...

Part 2 on it's way!


Thursday, 22 March 2018

Welcome To The Jungle

The old ones are always the best, right?

Cliched Post-headings aside, what follows is a quick report of my first game of Ghost Archipelago.
I would be using my 'Sinbad-esque' Northstar Crew, versus Andy in command of my own Sohei warrior-monks (originally for Warlord Games' excellent Test of Honour!).

As this was a demo game, we played the basic scenario- a brief explanation of the differences between GA and Frostgrave, and we were off!

It began with both Crews predictably advancing towards the central treasure at the sacrificial pit- Andy's peasants having a little trouble crossing the water separating them from the 'mainland', and drawing the attentions of a shark!
I split my Crew into two 'teams'- my Heritor Suladin leading one and his brother Omar (my Warden) leading the other. Omar's group split off and circled around the pyramid towards the treasures lying on some small islands, while Suladin forged on through the jungle towards the sacrificial pit.


Andy's Crew meanwhile advanced in force, with a 'firebase' of musket-men (counting as Crossbowmen) left behind to garrison some ruins that overlooked the treasure islands on his right flank.


One of my two Archers had a clear shot at the rival Crew as they made land-fall, but the enemy Heritor snatched the arrow out of the air!


Meanwhile, one of Andy's Infantrymen- afraid to cross the water surrounding his starting position- was ambushed by a venomous Snakeman! Perhaps embarrassed by his earlier hydrophobia, he took out his frustrations on the scaly creature and battered it to the ground over a couple of rounds of combat...

|*Green D6 used to track  the Snakeman's remaining health.

My other Archer (from Omar's team) had climbed the pyramid, and so now had commanding views over the whole battlefield. Unfortunately for me he did little but harass the enemy for the rest of the battle- until a pinpoint musket shot finally tumbled him from his precarious perch!


With my missile support proving ineffective, Suladin ordered his men to fall back to the pyramid with their treasure while he attempted to hold back the encroaching foe- in his first close combat of the game he Sprinted into melee with Andy's other Infantryman and promptly Critted the poor soul! He would go on to take out the enemy Warden and another peasant... Heritors are great!

*Natural 20 recorded here for posterity- it will never happen to me again...

While my Heritor got his hands dirty, I was playing it cagey on my left flank- the treasure was right there across the water, but Andy's formidable firebase of teppo-armed peasants was giving Omar and his lads pause... I buffed my Pearl Diver Tok with Omar's spells and then sent him on a daring amphibious assault mission- the water protecting him from the worst of the enemy fire and buying time for Omar and the others to make a mad dash across the water to the island!
Tok even managed to reach land, outflank the peasants and shiv one with his obsidian blade before an Infantryman (with a natty new pair of snakeskin boots!) got involved and clubbed him to the ground unceremoniously!


Continuing the aquatic misadventures, one of Andy's Crewmen attempted to escape from the mainland with the golden idol he was carrying- he got halfway across the water and promptly failed his next swimming test! The hungry shark from before obviously had a taste for peasant as it took a chunk out of him in the Creature Phase- the fresh blood in the water attracting yet another shark! In his next turn, the unfortunate swimmer failed his test again and the two ravenous fish closed in and chewed him up in short order, the idol sinking down through the red waters...

*Smile, you sonofa...Aarghh!

To cheer Andy up, his musket-men had recovered from Tok's surprise attack and opened up on Omar as he tried to reach the treasure on the small island- they had already downed his remaining Crewmate! Omar survived their fusillade (barely), and limped towards the water with treasure tucked under his arm. Slowed by his injuries and the weight of all that gold, he was caught by Andy's Heritor and (despite actually winning the first round!) cut down for his troubles, while his brother Suladin could only watch from the jungle, powerless to help!


And so the dust settled- both Crews had been mauled severely, but both had come away with a fair amount of loot! Even though this wasn't a Campaign game, we went through the after-game process just for fun. Everybody survived, and various magic weapons and herbs were discovered- I even managed to find a coveted map-stone with a roll of 20; you just know that I'll never manage that again when we play a proper Campaign!

Overall, GA is great fun- a nice change of environment from the dark ruins of Frostgrave and a chance to paint up some exotic characters and creatures! While Frostgrave is brilliant, GA really feels a little slicker! After playing, we had a long and enthusiastic discussion about ideas for Crews, and Andy went away with plans for a Spartan-inspired force. My next Crew is sat in the painting queue as I write this, and will be a band of greedy (and extremely sun-burnt) Vikings!

Thursday, 25 January 2018

This Town...

With Hunting Grounds being released into the wild this week, myself, Tony and Tom decided to revisit the first Scenario from the book- the Ghost Town.

I would be playing my Apache Posse- the Firemakers (using the Theme rules from HG); Tony would command the Dark Confederacy, and Tom would assume the mantle of the Twilight Order.

We would be playing on less urban terrain, so I set up a badlands ranch as the 'Ghost Town' surrounded by rock formations and cacti- as per the Scenario, the buildings would begin the game in the spirit realm; and so we used green glass counters to show this.

The game began with the Posses converging on the spectral buildings- the Twilight Order hanging back slightly to assume good firing positions (one rifleman by the name of Hank even clambering to the top of a precarious rock-spire), while the Confederates advanced behind their usual wall of expendable Revenants! The Firemakers, meanwhile, divided their forces- one half led by their Chief, Bodaway; the other led by the Shaman Taklishim.
Bodaway's group would shift into the Hunting Grounds and attack from there, while Taklishim's braves would mount an assault in the physical realm. The cards were kind to me, and I got the necessary red suits to pull this two-pronged assault off!

*The Firemakers cautiously advance on the ranch...

Careful fire-discipline in the early stages of the game saw the Order give the Confederates something to think about- first mowing down the Revenants and then opening up on the living behind, they managed to Shake the Necromancer- Tom knew that if he could drop the evil sorcerer, the Revenants would collapse and the Confederate numerical advantage would be neutered.
Unfortunately, he couldn't quite capitalise on this and the Necromancer managed to slink into the Hunting Grounds, from where he eventually managed to heal himself. In fact, this game saw uncharacteristically bad luck on the part of Tom beyond the initial turns!

*Hank takes up position atop a rock-spire to give covering fire to his comrades in the Order.

On the right flank, the Apaches ran into the Twilight Order's vanguard- a chaotic shootout ensued, during which Taklishim summoned a Wendigo- the beast screeched it's feral hunger most impressively; seconds before a silver bullet drilled it between the antlers and it dropped, physical form already unravelling. Meanwhile, the now-wounded Bodaway and his warriors were pinned behind the shack by a Confederate sniper atop the water-tower- with no red cards in my Hand to shift into the other realm, they were stuck for the moment... My cunning 'two-pronged assault' was already in tatters!

*The Wendigo appears from the aether and assumes an intimidating pose...
 

*... And an unimpressed Crusader of the Order guns it down without breaking stride!
 

Across the table, a mass brawl broke out in the yard between the Confederates and Twilight Order as they vied for control of the ghostly buildings and the loot within- both sides fed more and more fighters into the melee, but it soon appeared that the relentless undead (helped by Tom's atrocious luck!) had the upper hand...

*Things get messy out in the yard!

Taking advantage of this distraction, the Firemakers rallied and grabbed two loot counters from under the noses of the enemy- Taklishim and his surviving men mopped up the Order's grunts that still opposed them and positioned themselves ready to join the big scrap as the game drew to a close!
It didn't all go to plan, however- Bodaway (now in Wolf-Form) made a break from cover to draw attention away from his warrior who had the loot, and was gunned down by the Confederate sniper.
The sharpshooter then shifted into the Hunting Grounds to take down the fleeing Apache in the final turn- only to realise too late that his vantage point existed in the physical realm. The structure beneath his feet faded into a spectral outline, and the man plummeted to his death- the lesson here is always pay attention to which Plane of Existence you are in, kids!

*The Dark Confederacy secure the farmstead as the Skinwalkers melt away into the wilderness with their loot!

The game finally drew to it's bloody conclusion with the luckless Twilight Order wiped out to a man in the brutal melee and the Apaches making a fighting retreat against the relentless Confederates- both Posses reduced to a fraction of their former strength, and both holding two pieces of loot...

When the VP were counted up, the Confederates had squeaked a narrow victory thanks to the number of kills they had inflicted on the Order- a well deserved victory for Tony!


Thursday, 18 January 2018

Back in the Saddle...

A belated happy 2018!

After a well-earned rest following the madness that is my job during the festive period, I finally managed to catch up on the far more important business of gaming.

I wasn't completely idle, however- managing to snatch an hour of painting here and there meant I made some headway on my Ghost Archipelago stuff, and I even did some extra work on my Dracula's America Posses- getting some more hapless mooks finished for the Twilight Order and Red Hand Coven, plus starting a new Wolf-Form Skinwalker model for my Apaches...

*The new recruits.

*Some WIP fresh blood on it's way to DA!

*My Heritor Crew...
 
*...And my GA menagerie so far...
 
*...With more on the way!

During my break, I also got some extra rules material for Dracula's America under my belt so expect to see that in the future; either on the Osprey Games Blog or in magazines such as Wargames Illustrated!
I've also started a new, super-secret Dracula's America-related project that I'm very excited about, but I can't say much more as it's still extremely early days and it hasn't actually been officially green-lit by Osprey yet...

Er, looking back on what I just wrote, my break wasn't actually that much of a break really!

My first game of 2018 was an introductory game of the excellent Lion / Dragon Rampant- I've played both versions of this game many times over the last couple of years, and thought it was about time I introduced it to the Ingleton lads!

*The Armies advance towards each other as some pigs look on from the fields!

We broke out our SAGA Warbands for use in this game, and didn't really worry overmuch about army composition or coming up with a fancy Scenario- we just picked rough 24 point Retinues of the models we fancied using and then got on with the business of killing each other!

*My Viking Warlord and his Hearthguard (foreground) calls out his rival (on the left, waving his sword about) in the centre of the field.

As usual with L/DR, the game swung one way then the other; with both sides experiencing the highs and lows of dicing for activations- Team Awesome's legendary ability to snatch defeat from the jaws of victory saw us narrowly defeated in the first game. Since everybody was enjoying themselves, we pushed on and played a second game- this time, myself and Andy were utterly crushed in embarrassingly short order by Tony and Tom's much more decisive warriors.

*My brave warriors take the farm from a handful of enemy archers in the first game. The pigs are ours!

*In the second game, our warriors on the right flank are run down and massacred by enemy horsemen while our archers (and a few bemused cows) look on!

As the dust settled, L/DR was unanimously declared a great success by the Ingletonians- we will be playing more of it over the coming year, I'm sure (talk even turned to collecting Game of Thrones armies for it...).

Here's to a great new year of gaming!

Tuesday, 5 December 2017

Goodbye to the Frozen City...

Last week, we managed to squeeze in a final game of our current Frostgrave Campaign! This was simply due to my day-job getting crazy this time of year- in the new year we will be starting a new one (though I do have a plan in that regard...)!

I've just finished (and thoroughly enjoyed!) the Frostgrave novel Second Chances by Matthew Ward, and the climactic scene provided the inspiration for the Scenario we used.

The aim was to recover the four Treasures- interfering with a Treasure in any way (via Telekenesis or just picking it up) awoke the spirit of a long-dead Wizard that would appear as a Wraith in the central tower. These Wraiths once formed an evil cabal determined to cheat death by devouring the life-force of all living creatures in the City. These followed the rules for the Lich Lord in the Thaw of the Lich Lord expansion, but with only one HP each. Once all four Wraiths were defeated, their Master would himself appear in the central tower (again, using the Lich Lord stats but with only half his HP)- destroying him would end the game.
A tall order indeed!

Knowing this was to be the final game, we all spent every bit of gold we had on better Soldiers.
Herr Doktor Schreck (now recovered) would finally get to use his Ring of Power, Dregg and Grubb my surviving Goblin Thieves were upgraded to Treasure Hunters, and Mungo went from Infantryman to Barbarian. Most exciting of all, I purchased a Captain- the infamous Raggedy Bill, the murder-scarecrow!

*The Plague Doktors skulk in the trees. In the foreground we have Mungo, Raggedy-Bill (who is apparently so evil that snow melts wherever his wooden feet tread!), Dregg, the Apprentice, Igor; the Thug Fritz and the Archer Ivan.
Well ahead of them we have the rest of the Warband including Doktor Schreck himself (being uncharacteristically aggressive). Looming to their right we have the forbidding wall of the ruined tower.

Tony's Warband headed straight for the central tower with their characteristic aggression, and his Telekinesis-happy Spellcasters summoned the first two Wraiths.

*The first Wraith materialises. Below it, under the wooden plank, you can see Tony's Warband (Treasure in tow) cautiously entering the  ancient tower...

So began a ranged duel between his many Rangers and the undead Wizards. Initially the Wraiths had the upper-hand, but soon the sheer number of incoming arrows began to tell and the first one fell with a hellish shriek! The other Warbands breathed a collective sigh of relief- we had all been on the wrong end of his formidable 'bowline' this Campaign, so it was nice to see it put to use on something other than ourselves!

As the rest of the Treasures were gathered up with gleeful haste, the remaining Wraiths appeared and things got decidedly heated for Tony (we were all secretly hoping that his mob would be overwhelmed by the combined magical onslaught of the Wraiths!). It looked like our scheme might work until Andy, his blood up, charged into the tower to get to grips with the undead! Caught between two Warbands, the Wraiths began to fall one by one...


*Another Wraith (centre) is caught in a doorway between Tony and Andy's Soldiers, high on the walls of the tower!

While this unlikely- yet noble- alliance fought to preserve Frostgrave's living inhabitants on the walls of the storm-wracked tower, the Plague Doktors skulked in the trees near the main gates, waiting to see the outcome before getting involved. It was at this point that they spied Tom's Warband, led by the hated Sigillist that had betrayed Doktor Schreck in the Breeding Pits weeks earlier, making their way to the gates. Self-proclaimed 'Man of Science' he may be, but the good Doktor could not let such a chance for vengeance pass him by! The ragged mob of desperate scum and villainy came screaming out of the treeline just as the Sigillist himself was in the open- surrounded on all sides by misshapen Goblins, deranged lepers and a big dumb brute with a rusty scythe, the hated Wizard was cut down!
Seeing his employer shanked to death, one of Tom's (several) noble Templars charged forth to exact vengeance- but with a wave of Doktor Schreck's hand, his mighty greatsword crumbled to dust in his grasp and the unarmed man was quickly pulled down by the unwashed mass. The taste of vengeance sweet in their collective snaggle-toothed mouths, my Warband set about the reeling Sigillists. Raggedy Bill and Mungo subsequently made a nourishing gruel out of the Sigillist Apprentice, a Knight and a further Templar, before Tom's troops rallied and counter-attacked. The snows before the courtyard ran red, but predictably my own underlings soon began to suffer heavy casualties and started to slink away into the gathering darkness leaving their dead (including Doktor Schreck!) lying where they fell... Igor rubbed his gloved hands in glee; now he would be Wizard instead of the Wizard!

*Bloody mayhem before the tower gates between my Plague Doktors and Tom's surprised Sigillists.

While the screams and bellows of the vicious fight below echoed upwards, Tony and Andy continued the good fight atop the tower. With the final Wraith vanquished, the Overlord of the cabal appeared to unleash magical death upon the impertinent mortals. However, some poor dice rolling on his part saw his grand entrance become something of a farce- in fact, if he hadn't been ethereal he would most probably have tripped on his robe and tumbled down the stairs!

Seizing their chance, our heroes made one last charge and in a flurry of weapons the undead fiend was no more- a lingering shriek carried on the cold breeze all that remained of the anticlimactic revenant!

...And so, our tale draws to a close. Ancient evil turned out to be not as evil as we expected, and the Plague Doktors, now led by a power-drunk Igor, have slunk off into the night to plot new experiments.
New Warbands are being planned for the first Campaign of 2018- I am leaning towards taking my Barbarians, led by the Elementalist Tor Stormbrand.

However, it is rumoured that the Ghost Archipelago has returned to the Southern ocean, and crews are being hired to set sail in search of the mythical Crystal Pool...

*My Ghost Archipelago terrain- needs more jungle trees, but it's looking good so far- now I need to build and paint a Heritor and crew, and convince the other guys to do the same! Shouldn't be too hard...

Friday, 17 November 2017

This is the Pits!

Poor punning aside, here follows an account of Herr Doktor Schreck and his warband of miserable miscreants as they stumble their way through another Frostgrave misadventure- this time, deep underground in the depths of the Breeding Pits...

The intention behind this game was to familiarise ourselves with the rules for fighting in a Dungeon set-up, so think of it as an experiment of sorts- though being a foolhardy bunch, we agreed that it would still count as a Campaign game.

We used a set of MDF tiles I had had custom-made by the talented folks at Warbases for another game-design project. This represented the tunnels of the Breeding Pits quite nicely!

*The Dungeon, before the warbands turned up. I think it needs a few more tiles to make a full-sized layout, but it will do for now!

A single Treasure was placed in a central spot (worth 50 Experience, but 2 rolls on the Treasure table), guarded by two Armoured Skeletons. The dungeon also contained a few scattered bookshelves and other furniture (from Mantic Game's Dungeon Saga- regrettably still unpainted!) that could be searched for gold pieces and a slight chance of either uncovering a Treasure or an angry Giant Rat!

*This particular Giant Rat really should have stayed hiding in those barrels...

Each Warband would also earn a Treasure automatically at the end of the game, just for taking part in the experiment.
The large doors would block line of sight while shut, and take an Action to open or close. Opposing models either side could try to hold one open or shut against their foes by means of an opposed Fight roll- highest total overpowered their rivals!

We decided that our warbands would come on piecemeal from their designated entrance zone, with up to 3 models entering each Turn in the appropriate Phase (so you could bring your Wizard and two friends on in the Wizard Phase, for example).
This meant that the more powerful warbands of Tony and Tom would therefore take a little longer to gather their full force, as opposed to the small, ragged bands of survivors commanded by myself, John and Andy.

The game itself went well, and we even got to see the new Trap rules come into play- my misshapen Goblin Thief, Dregg, narrowly avoided scampering into a patch of Caltrops while Andy's Treasure Hunter got stuck in a Time Slip for a Turn!

*Andy's Treasure Hunter (middle), seconds before triggering the Time Slip and spending his next Turn falling into eternity. In hindsight, he was probably better off staying in the void between realities...

Fighting in the cramped tunnels was a predictably bloody affair, and despite their unwieldy warband size Tony and Tom's better quality Soldiers (including their new Captains) were soon in their element!

*The warbands begin to converge- things are about to get very ugly, very fast!

Where the three underdogs should have rallied together and presented a united front, they instead seemed more interested in scrapping with each other and fighting a tug-of-war over control of the doors.

*Andy and John tustle for control of the door, while Tony's murder-squad creeps up on them from the north...

Doktor Schreck, down to one HP by this point, managed to negotiate a hasty truce with Tom's all-powerful Sigilist. Meanwhile, Tony caught Andy's mob (six models in all, and now led by his Apprentice after the death of his Wizard previously!) in an old crypt and massacred them to a man, before bursting in to the chamber where the remains of mine and John's Warbands had attempted to barricade themselves in. Schreck and his remaining leprous minions beat a hasty retreat through the lines of his Sigilist ally with the sounds of John's warband being murdered ringing in their ears as they fled up the tunnel.

*Schreck and his Goblins cower in the corner and try to look non-threatening as the Sigilists crash into John's stage-magician and his hapless underlings. In the next Turn, Tony's rampaging warband will come crashing through the door to the right, and the good Doktor will take that as his cue to make a run for it!

But it was not to be. At the last, the good Doktor was betrayed by his new-found friend- despite the Sigilist's claims that "I'm only here for the books!", he was battered to the ground personally by the treacherous librarian. The last words he heard before his betrayer's dagger sank between his ribs were "It's nothing personal... I just want the experience."

*Infamy! Infamy! They've all got it in for me! Doktor Schreck is cut down by his supposed ally as he attempts to make good his escape...

After the battle, the battered but loyal remnants of Schreck's warband managed to drag his body with them- thankfully he wasn't dead after all, just badly hurt! One of the Goblins even managed to find a Thunderstrike Javelin on the way out, which was promptly sold.

Next game, Igor my Apprentice gets to show his quality in command of the warband while his boss sits it out to plot vengeance upon Tom's Sigilists!

Nostalgia Hit, Episode 3- It's a Rat's Life...

Earlier this week, the Skryre Warlocks took to the Blood Bowl pitch yet again (this time with 4 Gutter-Runners in the lineup), for another optimistic attempt at sporting glory...

...To cut a long (and exceedingly painful) story short, we got massacred by our opponents, the Geltdorff Griffons- who knew those rich-boy humans could be so vicious?!

*The Warlocks take command of the early game- it's all downhill from here, lads!..

Things started really well, with the Warlocks deftly breaking through the Griffon's line and scoring an early Turn 2 Touchdown. However, this success turned out to be our undoing as the human's 'fight or flight' response kicked in and they overwhelmingly went for the 'fight' option...

Not even the Orcs we played last time were so ruthlessly brutal- completely abandoning any attempt at finesse and strategic play, the Griffons set about murdering the Warlocks- even when they had the ball, their carrier stood poised one square away from my Endzone for several Turns while the rest of the Team set about my hapless rodents to really put the boot in. Some truly terrifying rolls saw my Dugout quickly begin to fill up with squealing Skaven who resolutely refused to come back out onto the pitch (sensible fellows...).
My tactic of making a hole with my Stormvermin, tying opponents up with Linerats and then scampering through with my Gutter-Runners for a Touchdown went out of the window as my dwindling Team were gradually, excrutiatingly, ground down by the murderous Humans!

*The dead and the dying begin to mount up at a terrifying rate. Squeak!

However, there were some slight rays of sunshine- best of all was my Gutter-Runner Skuttle declaring a Blitz, making three successive Dodge rolls to evade his human tormentors, then two Go For It rolls, followed by a successful Block on the Griffon carrying the ball! The surprised human was shoved back and the ball landed neatly in Skuttle's eager claws.
An enraged human Lineman ended Skuttle's short-lived triumph, and his terrified squeak was cut short by a sound very reminiscent of a giant, humanoid rat-man's neck snapping like a dry twig...

*Go on Skuttle, my son! You're a superstar; you're gonna live forever!...

*...Oh dear.

Skuttle, you will be remembered.

I'll admit that I'm starting to feel a little disheartened by these abject defeats. It is now apparent that my regular opponents Tom and Tony are nothing but brutish oafs with little appreciation for the art of 'Beautiful Blood Bowl', as practiced by the Warlocks.

Hence (and against my better judgement), I've recruited a Rat Ogre for next time! And failing that, my new Dwarf Team just arrived- if you can't beat 'em...

Tuesday, 14 November 2017

Er, guys... I think we broke it...

Welcome to what may very well be the penultimate post on our Massive Darkness Campaign.

The reason for this is simple- I think we broke the game...

Last night we played through the fifth (or sixth; I forget) mission- it involved finding a key that would unlock a vault imprisoning a hell-hound. Once the hell-hound was dead, it was back to the tavern for drinks and congratulatory back-slaps courtesy of the local populace.

Now, I've mentioned before that our party is pretty tooled-up with some extremely powerful combinations of skills and equipment. Maybe we have just been extremely lucky, but it feels like we've reached a point where nothing can actually really threaten us that much! We've all been backwards and forwards through the rules to try and see if we've been doing things wrong, but it doesn't look like it- we are now roughly half way through the missions and seem to have hit our power-cap.
By way of example, take Whisper; Aaron's Bloodmoon Nightrunner. He now gets a potential of 5 move Actions per Turn, and can move up to 4 zones in each one- a total of 20 zones of movement if he needs it. However, he also deals automatic wounds to all enemies in a zone whenever he enters it, and further damage when he leaves it (I can't recall the exact amount)- combined with the Slippery ability, he can simply hop in and out of a zone (up to 20 times!!) dealing automatic damage to every enemy there each time! And that's just one of us- the other four characters are equally ridiculous...

*BEFORE: The final phase of last night's game- with two of their number already Activated, the Heroes are surrounded by hordes of minions (so many that we couldn't fit them all on the same zone!) and a huge Spearmaiden Cyclops; while the  dreaded Hell-Hound prepares to burst out of it's prison...

*AFTER: The last three Heroes lay waste to the savage hordes by themselves, while their two comrades sit back and applaud politely. Seriously, this carnage was wrought in a single Turn by only three models!

As intoxicating as this god-like power was at first, I fear that the shine is starting to come off it a bit. And the prospect of another 5 missions of much the same thing suddenly holds less appeal.

So, we have decided to jump straight to the final mission next week, and then draw the Campaign to a close. MD is certainly a fun game with brilliant miniatures, but I think we will be sticking to playing each mission as a standalone in the future!..

Arnor Lives! Plus of course some rambling...

With the weather (only slightly) curtailing my wanderings in the Great Outdoors, I have been back at my painting desk feverishly churning th...