Anyway, this is the fifth or sixth game we have played set in the Sudan- it's not a war I know a great deal about (surprise, surprise!), but I do know that you can have camels...
Hence, I'm usually on the Sudanese side, and I always have as many guys riding camels as possible!
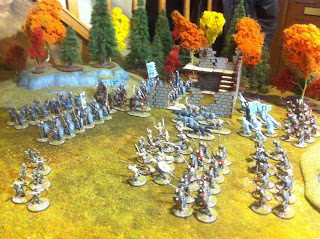
The Scenario was to be a simple breakthrough- the Brits (Tony) and their Egyptian allies (Tom) had to fight their way up the table and off to freedom, while the Sudanese (John, Andy and myself) could sweep in majestically from either flanking edge on their camels and lay waste to the enemy columns!


It all started so promising, as the over-confident Egyptians forged perilously far ahead of the sluggish Brits (Tom forgot to designate a stopping point when issuing orders, so his whole brigade moved their full speed straight up the valley- that's 36" for Infantry, and 54" for Cavalry!!).

Andy's brigade went straight up the centre to meet them, while my own Fanatical troops swept on from the right flank- my skirmishers taking up position in a ruined building to hopefully get some enfilading fire, while my camels readied themselves for a charge in the next Turn- I was wary of getting stuck in too early and being counter-charged by the British Lancers straight away, but in hindsight I probably should have just got stuck in while the Egyptians were in column and cut a hole through their formation. My fixation on preserving my undoubtedly valuable camels would prove my undoing...

Meanwhile John (the Mahdi himself!) forgot to state his orders before rolling his command test- this resulted in an automatic Blunder! Instead of sweeping on from the left flank to close the trap on the Egyptians, his whole brigade retreated. Since they were already off-table, we decided that this would delay them for a whole Turn while he got them back into position.
The Brits continued to advance cautiously (Tony only managed one Order on his command test), but would be ready to counter-charge my cavalry in the next Turn if I didn't act quickly- the Egyptians managed to shake their troops out into line and face my flanking force, while their skirmishers decided they had bitten off more than they could chew and fled before my screaming Tribesmen- ceding control of the oasis to my forces!

The Sudanese were still feeling good at the start of our second Turn- Andy managed to bring up the rest of his troops to reinforce the oasis and get in position to engage the Egyptians, while I got the bulk of my infantry up to join them- so far, so good... And then I failed the command test to get my cavalry moving- they just stood there, milling in confusion (I reasoned that the camels were stubbornly refusing to shift) as the British bore down upon them!
In the next Turn, the Brit cavalry leapt into life and crashed into my poor, dithering camelry- Lancers to the front of me, and Hussars to the left! Predictably, my much-vaunted camels evaporated like rain in the desert...

Meanwhile, the plucky Egyptians- now supported by their British allies- had a good round of fire that saw my poor infantry disordered. If I attacked in my next Turn it would be piecemeal, and easily repulsed...
Sudanese Turn 3 rolled around, and my surviving cavalry (only of the horse-kind, unfortunately) launched a desperate charge on the Egyptian lines on their own Initiative and overran a cannon. Making a sweeping advance into the flank of some Infantry, I rolled badly and couldn't capitalise- in fact, the Egyptians stood firm and drove me back with heavy casualties!
Meanwhile Andy made a spirited attack up the centre against some redcoats, while his own camelry struck the left flank of the Egyptian formation; but some devastating closing fire and bad dice rolls saw them repulsed.

Finally, after missing a Turn, the Mahdi had his disorganised troops poised and ready to sweep on from the left flank and close our trap before it could falter- and John promptly failed his command test! There were jeers from the Brits and Egyptians- and also a few from his underlings- as our fearless commander's brigade stood around just off-table, seemingly content just to watch his loyal warriors get cut down in the valley below!
I was first to go- my brigade was broken by a hammer-blow of Lancers and Hussars over the next couple of Turns, and so my leader (riding my last remaining camel) and a handful of ragged survivors were left to flee across the dunes to safety, shaking their fists and spears in defiance and cursing the Mahdi's name!

All credit to Andy- he managed to hold out just long enough for John's brigade to finally enter the battle, but it was too late! A small British Naval force had brought up a gatling gun, and set it up on the right flank (once occupied by my own troops) where it rained fire down on his beleaguered forces. Riddled with fire and already weakened by the fierce fighting, Andy's brigade finally broke when the Hussars returned from harrying my fleeing forces and crashed into them.
The Mahdi redeemed himself somewhat with a vicious attack on the right flank, but with two of the three Sudanese brigades broken he was forced to withdraw...

A victory to the British and Egyptian forces, and a highly entertaining and cinematic battle as always!

No comments:
Post a Comment