Friday, 30 November 2018

Arnor Lives! Plus of course some rambling...

With the weather (only slightly) curtailing my wanderings in the Great Outdoors, I have been back at my painting desk feverishly churning through my army of Arnor for Dragon Rampant, plus a couple of units for Angmar. I'm relieved to report that they are now complete! Next year I'll be looking to Rohan and Isengard and the Battle at the Fords of Isen, and then it's on to Mirkwood...

I'm still getting in regular gaming of course- though my tastes (and those of at least one of my gaming groups) are leaning more towards RPGs of late- the ubiquitous D&D (3.5 edition) of course, but also Call of Cthulhu, with the new edition of Warhammer Fantasy Role Play waiting in the wings...
My favourite type of miniature wargaming has always featured strong narrative elements (take Dracula's America, for example!), but I feel that this aspect is dominating my gaming more and more, and will likely become the focus of my miniature collecting/painting going forward- expect more 'stories' rather than 'battle-reports' on here in the future...
On this subject, I recently discovered the fantastic 'Nightfolk' range of miniatures by Northumbrian Tin Soldier- brilliant, whimsical figures with an old-school feel that evoke the influences of my childhood- films like Labyrinth, Dark Crystal, and the art of Brian Froud! Taking advantage of the recent sales, I picked up Sly Ralf's Boys and the Foggy Peak Goblingtons sets- who knows where this will end?

On the game design front I'm tinkering away on a few RPG systems of my own- who knows if they will ever see the light of day beyond my circle of gaming friends, but I'm enjoying the process regardless- and that, my friends, is all that matters!

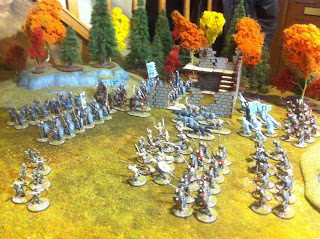
I'll leave you for now with a few photos of a clash between Arnor and Angmar, somewhere on the North Downs- and as always, apologies for the fuzzy camera-phone photos! I am also thinking of making a more suitable backdrop for my photos- my living-room doesn't quite evoke Middle Earth, does it?!

The battle lines close-in...
 
Plucky Hobbit archers harass the barbarians of Carn Dum from the flanks!
 
Riders of Arnor intercept Wargs trying to outflank the Arthedainian shield-wall.
 
The Orcish hordes!
 
King Arvedui and Malbeth the Seer face down the Witch King himself and his fell spirits.


Sunday, 12 August 2018

Return to Dracula's America, Part 3- Louder Than Words

Here we are with the last in this little 'mini-series' of Posts giving you new rules to try out in your games of Dracula's America.
This time we will be looking at some new rules for Actions, to give your models some additional, dynamic options during play.

The usual disclaimer applies here- these are not yet 'official' amendments to the rules, so you should always agree to their use with your opponents beforehand. Please do give them a go, though, and see what you think- any feedback can be shared with me either here or on the Lead Adventure Forum (I don't have Facebook so won't be able to keep track of things on the Player's Page!).

Let's get to it:


SPRINT.
Once per Activation, an unengaged model that is on foot may Sprint instead of making a normal Move Action.
For the duration of that Move, the model adds +2" to it's Move Rate (so typically giving a total movement of 6"). However, this Move must be made in a straight line- choose the direction you will Sprint before making the Action.
You can use Sprint to Charge or engage an enemy.


SNAP-FIRE.
Once per Activation, a model may Snap-Fire instead of making a normal Shoot Action.
This Action must always be made against the closest visible Target, and the Shooter makes a 1 Die Shooting Test that can never be modified in any way.
If a Hit is scored, then the Target must make a 1 Die Nerve Test- if Successful, they are unaffected. If they Fail this Test they are marked as Done (think of them as pinned-down by the wild incoming fire).
As soon as the Snap-Fire is resolved, the Shooter's Action ends immediately- using a Skill or Weapon (such as a Repeater Rifle) does not allow you to make any additional shots in the same Action!


BLIND-FIRE.
Once per Activation, a model may Blind-Fire instead of making a normal Shoot Action.
Resolve a Snap-Fire attack using the rules above (this counts as your Snap-Fire for that Activation), but treat the shot as being made from a position 1" away and in LOS of the Shooter. This must be a position that would be accessible to the Shooter, and allows you to represent things like a model quickly ducking from around a corner to get in a hasty shot, before ducking back into cover.
In this way, you can potentially avoid triggering an enemy model on Lookout.


LIE PRONE.
An unengaged model on foot may Lie Prone at the end of any Move Action. Lie the model on it's side and give it a Prone marker to show this (and to differentiate it from Downed models).
A Prone model can stand back up, but this takes up an entire Action. Until then it may be harder to see, counts as being in Cover against Shooting (even if in the open), may Move up to 2", may not Charge or otherwise engage an enemy, cannot hold a Bystander and suffers a -1 Die Modifier in a Fight. It may still Shoot or Cast Arcane Powers.


So far I've found these options to be good fun, and that they serve to make the game even more cinematic; but let me know what you think after giving them a go!

I'll be back in the near future with some more Drac.Am painting...

Friday, 10 August 2018

Return to Dracula's America, Part 2- Regarding Summoning, and the Gentle Art of Hitting Things.

Hello, folks!

Here is the second batch of optional rules for Drac.Am for you to take a look at- as before, please give them a try and let me know what you think, but remember that these aren't official new rules; simply some 'work in progress' options for you to try out ahead of a future errata/FAQ...

Don't forget to spread the word- the more people we have testing them out, the better!


First up, Fighting- I know that some people find this a little underwhelming compared to shooting, and this was deliberate since I wanted this to be a game about close-range fire-fights rather than a face-to-face slugging match! But for those who favour fisticuffs, here are some new rules to try out:


FIGHTING.
  • When you Strike your opponent, their Save is determined by the total Successes you scored, rather than the difference between your totals.
  • Shoving works exactly as before- you push your opponent away a number of inches equal to the difference between totals.
  • If the Defender wins the Fight, they will not Strike their Attacker. Instead, they may either remain engaged or Shove their opponent away.

Now here's an alternate idea for Summoning in the game- some players feel that this can get a little out of control (especially with an optimised Crossroads Cult Posse!), so here is one possible solution to this:


SUMMONING.
If your Posse has the ability to Summon other models during play, you will generate a 'Pool' of 4 Summoning Points (SP) at the start of each game.

SP are expended whenever you Summon a model during that game- whenever you successfully Summon a creature, reduce your Pool by the corresponding amount of SP shown below.

Use a piece of spare paper to track the number of Points you have available during play, and ensure you keep your opponents updated on how many SP you have remaining as the game progresses!
  • Lesser Entities cost 1/2 an SP each.
  • Minor Entities cost 1 SP each.
  • Major Entities cost 2 SP each.
For example, I successfully Summon a Behemoth- this costs me 2 SP. I now have 2 SP remaining in my Pool. Later that game, I Summon a Lesser Entity- this costs me 1/2 an SP. I now have 1 and-a-half SP remaining in my Pool!

Return to Dracula's America. Part 1- 'Tis But A Scratch!

Time to blow the cobwebs off this Blog...

While my gaming time has been limited due to me taking advantage of the dry weather (though my Church of Dagon Posse is coming along nicely), I haven't been idle behind the scenes- between myself, Northstar Miniatures and Osprey Games you will hopefully start to see a gradual release of additional material for players of Drac.Am over the coming months!
While I can't give too much away right now, expect new rules for Twilight Order and Red Hand players, new Factions, new Hired Guns and Mercenary Drifters, rules for setting your games and campaigns in a new environment, and extended background dealing with the aftermath of Forbidden Power- even a look into the origins of Dracula and vampirism. I'm also working on a 'choose your own adventure' style 'branching narrative campaign' to tie it all together...

Hopefully we can round it all off with an Errata/FAQ, and a few optional or updated rules- in that spirit, I thought I'd share an idea for new Injury Tables with you here, so you can have a crack at them and maybe even give me some feedback! I intended the existing Injury system to be pretty unforgiving, to represent the dangers of living in a world populated by monsters (human and otherwise), but I'm aware that it can be a little too 'rich' for some- here, then, are a set of (slightly) more forgiving Injury Tables for the faint of heart!


INJURY TABLE.

1 = Dead!

2-4 = Lasting Injury. Roll a D5 on the Table below.

5-9 = Close Call. No effect; the model is unharmed.

10 = True Grit!

LASTING INJURY TABLE.

1 = Old Wound.
2 = One-Eyed.
3 = Limp.
4 = Weakened.
5 = Laid-Up. You may pay $5 for medical treatment at this point to treat this as a Close Call.


Please feel free to share this on the Players Facebook Page, or discuss it with me via the Lead Adventure Forum- the more folks that give it a try, the better! Let me also just reiterate that these are still WIP and are not 'official' amendments to the existing rules- as usual, both you and your opponent/s must agree to their use beforehand!


Next up, some options for Summoning...

Friday, 15 June 2018

A Shameless Plug...

What with there being a period of unseasonable weather (sunshine in June?! The world has gone mad, I tell you!), things have been pretty quiet on the gaming front this last month or so- hence the dearth of Posts here. Though I've still managed to flap my hobby-butterfly wings, and started a Gangs of Rome project- more on that very soon, I promise!

But I digress... Here is the titular Shameless Plug, to let you know that Northstar Figures have just started their 'Nickstarter' pre-order programme for Dracula's America: Forbidden Power- there is money to be saved, and free miniatures (plus some very nice acrylic tokens) to be had if enough people jump aboard! The link is below:

http://nstarmagazine.com/DRACULA_SHADOWS_OF_THE_WEST_FORBIDDEN_POWER.htm


And now back to our regularly-scheduled programming...

Friday, 11 May 2018

The Clouds Burst, Part 2

Well that last Post was a bit long-winded!

So let's move on to Scenario 2- in this, the Free Folk have fallen back towards the lower slopes of Erebor as the armies of Bolg pursue them. This game was played across the table diagonally, with the Gates of Erebor off-table to the Free Folk's left and the lower slopes behind them.

Serried ranks of spearmen- Dwarf, Elf and Man alike- presented a wall of glittering points towards the enemy. Unperturbed, the forces of Evil came on in a great rush- accompanied by a Troll!

Rather predictably, there wasn't too much manoeuver from the Free Folk in the early game as they assumed their Wall of Spears in the centre and on the left, while Mirkwood Archers stood on the right with arrows nocked...
The Goblins charged forwards en masse, with the Troll lumbering up behind them and Wargs once more prowling on the flanks.

*The Free Folk nervously stare down the onrushing horde...

With the distance closing, white-fletched Elven arrows began to fall amongst the packed ranks of Goblins and casualties began to mount- one Unit of cowardly scum even fled in tatters before the deadly rain of Elf-Shot! This had the effect of driving the bulk of the Evil force away from the Elves- straight towards the Dwarves on the left flank...

At that moment, a great cry of horror went up as yet more Goblins suddenly appeared behind the Free Folk, clambering over and down the lower slopes of Erebor to catch the defenders in a deadly pincer move!

*It's a trap!
 

Denied any targets, the Elven Archers now turned smoothly and let fly at the ambushing Goblins- once again they proved deadly accurate, and countless foul creatures tumbled from their vantage point with despairing cries- the remainder routing in panic. Under cover of this lethal bow-fire, the Elven Spearmen marched up to confront the surviving Goblin ambushers as they descended.

Meanwhile, a few desultory skirmishes were fought on the left- the Goblins and Wargs had the worst of it, but even so many brave Dwarves would never see the Iron Hills again. Repeated waves of attackers battered the Dwarven lines relentlessly, as the forces of Evil played for time and the Troll loomed ever-closer...

*Can the Dwarves kill enough Goblins before the Troll reaches them? Errr...

A great groan of dismay went up from the Free Folk as once again the relentless pressure of Goblin wave attacks bore fruit as the Dwarf Warriors on the left collapsed and were over-run by howling Wargs, which began to rampage through the backline, hoping to link up with the Goblins coming down the mountainside. The spear-armed Dwarves finally managed to destroy the Goblins they were facing but it was too late, as the ominous shadow of the Troll fell across them...

When things seemed to be at their bleakest, another shout rose above the din of battle- this time accompanied by the thunder of falling masonry as Thorin, the King Under the Mountain and his Company sallied forth! Smashing into the Goblin ambushers like a thunderbolt, they trampled the surprised creatures and continued on into the Wargs prowling the rear of the Free Folk lines. Wiping dark blood from their weapons, and mourning the loss of Bombur, Bofur, Bifur, Nori, Dori, and Nori they turned to face the Troll as it enthusiastically tore through the beleaguered Dwarf Spears...

*...And cue the dramatic theme music- Thorin takes charge of the situation!

But the sixth Battle Turn had now ended (and it was getting late!), so it was time to determine the winner of the Scenario- though they had blunted the Goblin attack, the Free Folk had fewer surviving Units in play and so the Shadow was once again triumphant- though only just!

Next week will see us play the final Scenario, as the ragged survivors of the Free Folk confront Bolg and his minions- will Beorn and the Eagles turn up in time? Will we be able to squeak a Pyrrhic Victory by killing the Goblin King? With my dice rolling, who knows!..

The Clouds Burst, Part 1

Last night, I finally got to use my Battle of Five Armies collection in a game- two games, in fact! In a happy coincidence we had five players- Tony and Tom would command the Wargs and Goblins respectively, while myself, John and Andy would take control of the Dwarves, Elves and Humans; with control of Gandalf being shared between us!

As I've mentioned briefly before, I had decided to break the events of the Battle into three Scenarios- each game would represent a smaller 'snapshot' of the larger struggle, and so a little 'Gamer's Licence' has been used! In general though, I hoped to represent the broad storyline of the conflict.

Before going any further, I will admit that I love the Dragon Rampant rules. They are quick to pick up and their unpredictability makes for some nice narrative moments. They allow you to be creative in the Units you field, and it's 'large skirmish' scale means you don't need to paint hundreds of models- for someone who gets easily distracted from one project to another, this is a real plus!
Some will say it's not suited to larger battles, but with a little bit of imagination and flexibility I think they can still serve you well...

Having said that, a few changes were made for these Scenarios-
  • Battle Turns. Because these Scenarios called for certain events to happen at certain times, or to have a set time limit, we split each into 6 Battle Turns. In each Battle Turn, each side would get a Player Turn.

  • Proximity. We prefer a 1" minimum distance between Units as opposed to the usual 3". We also allow friendly Units to pass through one another, as long as neither is Battered.

  • Command Chits. In DR, failing to order a Unit ends your Turn immediately. This can be a little too random for some, so we decided that each side would roll a D6 at the start of every Battle Turn to determine how many Command Chits they would receive:                                   1 = No Chits, 2-5 = one Chit, 6 = two Chits. Each Chit was basically an 'extra life' that allowed you to maintain the initiative following a failed Activation Test.
SCENARIO ONE.
The Elves, Men and Dwarves face off against each other while Gandalf (Bilbo in tow) strides between the rival forces and tries to defuse the situation! Meanwhile, the forces of Evil pour onto the battlefield, catching the Free Folk unprepared...

*The set-up. Bickering Free Folk on the left and the hordes of Shadow on the right!
 

Evil went first, and the hordes of Goblins charged across the plain- meanwhile the Wargs held back a little and attempted to outflank the Elves. The Free Folk desperately tried to pull back into a battle-line, but the confusion caused by the sudden arrival of the ravening hordes meant they were slow to do so (all their Activation Tests suffered a -1 penalty in the first Battle Turn!).

The Bowmen of Esgaroth abandoned the rocky hill and fell back towards Gandalf. On their right flank, the Esgaroth Warriors formed up into a Wall of Spears just in time- the first wave of Goblins crashed into them, while the Elven Spearmen behind failed to Activate and stood watching the carnage as the Men repulsed the Goblins at terrible cost; only to be pounced upon by a pack of Wargs! Battered by this experience, the Men fell back with their defensive formation in tatters!

Meanwhile on our left flank, the Dwarf Warriors caught another mob of Goblins as they rounded the hill- great slaughter was inflicted on both sides (mainly because my dice rolling was so bad!), and their long hatred for one another saw both Units wiped out (In actual fact, both Units failed their Courage Tests and Routed, but our explanation is much more heroic)!
Our left flank was now wide open, but thankfully only a few Goblin Archers were now present there and seemed reluctant to exploit the hole in our defences...

As yet more Goblins crested the hill and poured down into the valley, the Elves finally woke up and heroically interposed themselves between the onrushing hordes of Evil and the ragged Men of Esgaroth. Repulsing the Wargs harrying the retreating Men, they assumed a Wall of Spears in time to blunt another Goblin attack- routing the cowardly curs in a flurry of leaf-shaped spear-tips!

*At the height of the fighting- the Free Folk are hard-pressed on all sides!

Nearby, Gandalf raised a hand and lightning flashed across the battlefield! It struck a mob of Goblins and caused terrible casualties, but somehow the fiends continued their rush and caught the Bowmen of Esgaroth. Despite the deaths of many comrades, the Men fell back Battered but unbowed.
Shrieking in fury, the Goblins charged again and this time the Bowmen were cut down where they stood! As another wave of Goblins crested the hill, Gandalf's magic once again struck the Bowmen's killers and routed them- the craven survivors scurrying back to their lairs, now shrieking in terror!

*The Elves and Men stand together as it appears the forces of Evil are faltering...

Meanwhile the Elves and surviving Men formed a wedge of bristling spear-points to meet the fresh Goblins coming down the hill, their grim resolve also keeping the circling Wargs at bay.
At the last moment the Goblins changed direction as if driven by some dark will and started heading towards Gandalf, who looked a little exposed as he stood with Bilbo peering from behind the Wizard's cloak... Taking advantage of the confusion, the Wargs saw their opportunity and pounced on the Men of Esgaroth, having circled around the Mirkwood Spears while their pack-mates kept the Elves occupied to their front. The screams of dying Men were soon silenced by the triumphant howling of wolves!

*Things look grim for the Grey Pilgrim...

With that last combat, the sixth Battle Turn ended and with it the Scenario- incredibly close, but Evil had won a narrow victory as the Free Folk fell back towards Erebor...

Part 2 on it's way!


Thursday, 10 May 2018

The Gathering of the Clouds, Part 5

Just a quick Post today, to show you my finished Mirkwood Elves contingent!

These are the new, long-awaited Oathmark plastics and they are very nice indeed- understated (for Elves) and practically-attired for battle!
No idea what the runic pectoral disc is about, but to my mind it helps to set the Elves apart as a unique culture with their own, alien aesthetic...

*Mirkwood Spearmen form up for battle.

As I think I mentioned previously, I wasn't too keen on the shields you get with the kit as they were a bit too 'War-Hammery' for this project; the kite shields really do the job though.

Colour-wise I went for the predictable 'Wood Elf' palette of greens and browns, but decided to go for bronze on the helmets and armour trim- I'll save the silver for High Elves (if/when I get around to them)!
Likewise I went for a selection of 'Celtic' hair colours, and used three different tones of green (though they don't really show up that well in the photos) to make them appear less uniform and a little 'Wilder, and less wise'...

*It wouldn't be Elves without archers!

Tonight the Ingleton lads are coming over for a game- this will be more of a play-test of the first Scenario for the Battle of Five Armies, which I am breaking down into three Scenarios to better suit the smaller scale of the Dragon Rampant rules.

*Another blatantly staged photo- Elves ambush Goblins along a forest road. Typical Elf propaganda!

Expect a report on how it went in the next couple of days!

Wednesday, 2 May 2018

The Gathering of the Clouds, Part 4.

The end is in sight!

Last week I managed to finish Thorin's Company and Bilbo Baggins; and over the weekend I got Bolg and his Guard completed as well- all that remains is for my Oathmark Elves to arrive, and that will be the last contingent for my Battle of Five Armies project!

Some of you may have already seen Thorin's lads over on the Lead Adventure Forum, but for everyone else here are a few shots- I went for fully armed and armoured figures to represent them as they might have looked during the Battle, and I also multi-based them as I'm classing them as Elite Foot rules-wise (such units are traditionally 6 models strong, hence six bases!); I have plans for individually based figures in hoods and travelling gear in the future...
You might have noticed that every Dwarf also bears their 'hood colour' somewhere about their person, as noted in the Unexpected Party chapter of The Hobbit!

*Thorin (centre), Fili (L) and Kili (R) (all Oathmark).
 
*L-R: Dwalin, Balin. Dori and Nori (Oathmark and Conqueror Dark Age Dwarves).
 
*L-R: Bifur, Ori, Gloin, Oin (again, a mixture of Oathmark and Conqueror Dwarves).
 
*L-R: Bilbo, Bombur and Bofur (GW, Foundry Norse Dwarf and Oathmark again!).
 
 
Opposing our brave Company of Dwarves we have Bolg and his Guard- these are all Oathmark Goblins! Again, these will count as Elite Foot during the game.
 
 
*Couldn't resist staging this shot of Bolg's last moments!
"Er, pointing at him won't do us much good, Chief!.."
 
 
I'm itching to get on with actually playing a game now- I happen to be off work next week, so hopefully I can rattle through the Elves and have an AAR to share in the next couple of weeks!
 
Meanwhile, I have a pile of stuff ready and waiting for the next phase of my Middle Earth project- Late Romans/Romano-British to represent the battered defenders of Arnor, GW Warriors of the Dead for various Evil Spirits, and some Ancient Britons as the men of Carn Dum- throw in the Goblins I already have, and that should give me a good cross-section of the Legions of Angmar!


Wednesday, 18 April 2018

The Gathering of the Clouds, Part 3.

I'm back, with another update on my Battle of Five Armies project!

What with the improving weather, much of my spare time lately has been spent tramping the hills and dales around my house- but I've still managed to paint up some new stuff none-the-less...

First off was my Great Eagle- this thing is huge, but since it's a plastic kit it was nice and easy to build. You can actually make two Eagles from the GW boxed set, but for now the other remains on the shelf unpainted. I'm looking forward to seeing it swoop through the ranks of Gundabad very soon!

*The Great Eagle crashes into a mob of Gundabad Orcs, while the Grey Pilgrim  himself looks on.

Speaking of which, I've finally churned through the rest of my Goblins in the form of two Units of Warriors with various hand weapons- once again, these are the Oathmark plastics from Northstar!

*The forces of the Shadow as they stand so far- this little lot should cover all my Goblin requirements for future Middle Earth projects...

Last of all was Gandalf himself- this is a re-paint/re-basing of an old GW model I had lying around, and I'm pretty pleased with how he turned out.

*A closer look at my Great Eagle and good old Gandalf the Grey- probably my favourite Tolkien character!

This week the new plastic Elves for Oathmark went up for order, so I immediately bought a couple of boxes plus the metal character models for my Mirkwood contingent. The only thing I'm not so keen on in the kit are the shields, which look a little too 'Warhammer' for me- so I've ordered some kite shields from Gripping Beast to replace them. These have the benefit of giving that 'Dark Age' feel I'm after; plus they look a little bit like leaves, in keeping with the Elven aesthetic!

In the meantime I have Bolg and his guard plus Thorin's Company (and Bilbo!) assembled and ready for undercoating- after all that is completed I think it will finally be time for some games of Dragon Rampant!

After that? Maybe a quick trip to Sub-Roman Britain via Dux Bellorum before it's back to Middle Earth for the Angmar/Arnor wars...

Wednesday, 28 March 2018

The Gathering of the Clouds, Part 2.

The Middle Earth project is going well so far- I've just finished the basing on my Iron Hills Dwarves and Wargs!

*Dwarf warriors form-up around their Captain (Oathmark miniatures by Northstar) as Wargs (Otherworld Miniatures Wolves) burst from the trees!
 

*Being quite a militaristic culture, I went for a fairly 'uniform' look to my Iron Hills Dwarves using a palette of red, black and off-white!
 

I know Tolkien mentions the Dwarves being armed mainly with two-handed mattocks in the battle- however the Oathmark Dwarves don't come with this option so for now I've gone for the good old fashioned spear and shield for one unit and sword/axe/hammer and shield for the other!
After much searching, I came across an excellent range of 'Dark Age Dwarves' by Conqueror Miniatures- I ordered a pack of their Dwarves with two-handed hammers, and these have just arrived today (along with the models I will be using for Dain and his hangers-on), and they look like a great match scale-wise for the Oathmark plastics!

*The Hound of Sauron surveys the battle (Otherworld Dire Wolf).
 

Right now I have a Great Eagle (the GW plastic kit) to finish off and then it's on to yet more Oathmark Goblins!..

*The forces of the Free Folk so far (Hopefully not long now until the Oathmark Elves are out!)...
 
*...And the army of the Shadow as it stands- soon to grow in numbers!
 
As always, cheers for reading! I'll be back with a finished Eagle in the near future, along with some musings on what figure ranges I'll be looking at for future Middle Earth painting!


Sunday, 25 March 2018

The Gathering of the Clouds, Part 1.

I mentioned a big new painting project in my last Post- this will be a Middle Earth collection, based on Tolkien's stories and the imagery in Cubicle 7's outstanding The One Ring RPG sourcebooks rather than the movies. This is something I've always wanted to do, and it seems like the time is now right!

So, throughout this Post you will see my collection so far- Men of Esgaroth plus Beorn, versus Goblins from Gundabad and a Troll. Following closely behind these in a later Post you will see my Iron Hills Dwarves and Wargs.

*The forces clash over an outpost on the shores of the Long Lake!

Apart from the Old West, the Dark Ages is my favourite historical period to game in- so for figures I will be mainly looking at ranges from this era (plus a few Ancients where applicable!).
Apart from this, I'll also be using Northstar's Oathmark plastic fantasy figures for much of the 'non-human' stuff, amongst others- in short, this will be an opportunity to pick and choose all kinds of interesting minis to suit the needs of the project!

*Bard and his Bowmen hold the hill (Gripping Beast plastic Late Romans)...

I had a good think about scale and also which rules I would use- after much deliberation, I settled on 28mm (though 10 and 15mm were in the running) as the extra detail and character were a no-brainer! Rules-wise I will be using Dragon Rampant (with a couple of 'tweaks' for extra flavour) as it's fun and quick to play, while being sufficiently open-ended when it comes to designing units. As the figures are mainly individually based, I could also branch out into Saga, Open Combat, Song of Blades and Heroes or even GW's Strategy Battle Game!

*...While a Goblin Shaman and his minions storm the lower slopes (Oathmark plastic Goblin Infantry)!

The downside of choosing DR is that it's not really intended to represent 'mass battles'- I reasoned that I could look at a given battle as described by Tolkien and break it down into several separate scenarios, with each being just one 'snapshot' of the larger battle- of course, a little gamer's licence could also come to the fore as required... For example each individual figure could actually represent several warriors. Broad brush-strokes will be the order of the day!

*A clash of the titans (Reaper Bones Ogre, and a DeeZee- I think- cave bear).

To kick off the collection, I decided to focus on the Battle of Five Armies from The Hobbit- this would give me a nice spread of interesting troop types and characters as a foundation for later. I will also be looking at the wars between Arnor and Angmar, the Battles of the Fords of Isen and eventually work my way up to the 'big daddy'- Pelennor Fields!

*Another shot of the forces of the Shadow...
 
*...And another of the brave Men of Esgaroth (plus friend!).
 
Finally, I'll leave you with a quick question about Beorn- I like the model I'm using right now, but I wonder if he could be bigger still? Most of the artwork I've seen seems to shows Beorn towering over the other fighters- to this end, I picked up a pre-painted variant from Ebay. What do you think- is this fellow too big, or more appropriate?
 
 
Cheers!


Thursday, 22 March 2018

Dracula's Painting Part 2- The Revenge!

During my recent extended period of Internet 'downtime', I managed to get some more figures painted for my steadily-growing Dracula's America collection...

I may be bringing some of these along with me to the demo game at Partizan in May- I always feel nervous handling the fantastically painted 'official' miniatures!

First off, we have my Shadow Dragon Tong Posse:

*I tried to give my two Guilao (the spearman on the left and the central swordsman) a 'ghostly' paint-effect on their arms to give the feel of them being partially ethereal- not sure how well it worked out, but it was an interesting experiment!

Followed by the second of the new Factions from Hunting Grounds- The Forsaken:

*Not sure if the photo shows it very well, but I'm very pleased with the painted-on weathering- if you look closely you might see a few elbows and knees (even a few toes!) sticking out of the clothing- the fellow bottom left also has some tears in his sleeve... The Trooper on the far right has both a mounted and dismounted version.

Next, we have a rag-tag band of Hired Guns, including the Wargames Illustrated Django and his portable gatling gun (kept in the coffin when not in use, of course!). Getting to write rules for using him in DA was a real treat!

*I'm particularly pleased with how the Stitch Doctor turned out- a deceptively simple miniature that was a joy to paint- I used several different skin tones on various parts of him to try and give him a 'patchwork' look, but again I suspect my camera-phone doesn't really show this very well!

And finally, my Unwelcome Guests. These were great fun to paint- especially the Jackalope, which I've been wanting to paint up for ages now! Thanks also to Ash at Guerrilla Miniature Games for the inspiration to paint the Hellhound up as a skinless monstrosity.

*The only one of these critters that is not an 'official' DA figure is the Vampire Ancient on the right- this is a 'Vampire in Manbat form' by the excellent Heresy Miniatures!

So, that's everything new for now- I have some more Apaches close to finishing (to replace my tiny wee Foundry ones who are looking a little bit small compared to everybody else!), and then I'd like to turn my hand to the new Northstar Plains Skinwalker Posse...

I'll be back soon with the first offerings for what I hope will be my big painting project for this year- something I've been wanting to do for many years...

Welcome To The Jungle

The old ones are always the best, right?

Cliched Post-headings aside, what follows is a quick report of my first game of Ghost Archipelago.
I would be using my 'Sinbad-esque' Northstar Crew, versus Andy in command of my own Sohei warrior-monks (originally for Warlord Games' excellent Test of Honour!).

As this was a demo game, we played the basic scenario- a brief explanation of the differences between GA and Frostgrave, and we were off!

It began with both Crews predictably advancing towards the central treasure at the sacrificial pit- Andy's peasants having a little trouble crossing the water separating them from the 'mainland', and drawing the attentions of a shark!
I split my Crew into two 'teams'- my Heritor Suladin leading one and his brother Omar (my Warden) leading the other. Omar's group split off and circled around the pyramid towards the treasures lying on some small islands, while Suladin forged on through the jungle towards the sacrificial pit.


Andy's Crew meanwhile advanced in force, with a 'firebase' of musket-men (counting as Crossbowmen) left behind to garrison some ruins that overlooked the treasure islands on his right flank.


One of my two Archers had a clear shot at the rival Crew as they made land-fall, but the enemy Heritor snatched the arrow out of the air!


Meanwhile, one of Andy's Infantrymen- afraid to cross the water surrounding his starting position- was ambushed by a venomous Snakeman! Perhaps embarrassed by his earlier hydrophobia, he took out his frustrations on the scaly creature and battered it to the ground over a couple of rounds of combat...

|*Green D6 used to track  the Snakeman's remaining health.

My other Archer (from Omar's team) had climbed the pyramid, and so now had commanding views over the whole battlefield. Unfortunately for me he did little but harass the enemy for the rest of the battle- until a pinpoint musket shot finally tumbled him from his precarious perch!


With my missile support proving ineffective, Suladin ordered his men to fall back to the pyramid with their treasure while he attempted to hold back the encroaching foe- in his first close combat of the game he Sprinted into melee with Andy's other Infantryman and promptly Critted the poor soul! He would go on to take out the enemy Warden and another peasant... Heritors are great!

*Natural 20 recorded here for posterity- it will never happen to me again...

While my Heritor got his hands dirty, I was playing it cagey on my left flank- the treasure was right there across the water, but Andy's formidable firebase of teppo-armed peasants was giving Omar and his lads pause... I buffed my Pearl Diver Tok with Omar's spells and then sent him on a daring amphibious assault mission- the water protecting him from the worst of the enemy fire and buying time for Omar and the others to make a mad dash across the water to the island!
Tok even managed to reach land, outflank the peasants and shiv one with his obsidian blade before an Infantryman (with a natty new pair of snakeskin boots!) got involved and clubbed him to the ground unceremoniously!


Continuing the aquatic misadventures, one of Andy's Crewmen attempted to escape from the mainland with the golden idol he was carrying- he got halfway across the water and promptly failed his next swimming test! The hungry shark from before obviously had a taste for peasant as it took a chunk out of him in the Creature Phase- the fresh blood in the water attracting yet another shark! In his next turn, the unfortunate swimmer failed his test again and the two ravenous fish closed in and chewed him up in short order, the idol sinking down through the red waters...

*Smile, you sonofa...Aarghh!

To cheer Andy up, his musket-men had recovered from Tok's surprise attack and opened up on Omar as he tried to reach the treasure on the small island- they had already downed his remaining Crewmate! Omar survived their fusillade (barely), and limped towards the water with treasure tucked under his arm. Slowed by his injuries and the weight of all that gold, he was caught by Andy's Heritor and (despite actually winning the first round!) cut down for his troubles, while his brother Suladin could only watch from the jungle, powerless to help!


And so the dust settled- both Crews had been mauled severely, but both had come away with a fair amount of loot! Even though this wasn't a Campaign game, we went through the after-game process just for fun. Everybody survived, and various magic weapons and herbs were discovered- I even managed to find a coveted map-stone with a roll of 20; you just know that I'll never manage that again when we play a proper Campaign!

Overall, GA is great fun- a nice change of environment from the dark ruins of Frostgrave and a chance to paint up some exotic characters and creatures! While Frostgrave is brilliant, GA really feels a little slicker! After playing, we had a long and enthusiastic discussion about ideas for Crews, and Andy went away with plans for a Spartan-inspired force. My next Crew is sat in the painting queue as I write this, and will be a band of greedy (and extremely sun-burnt) Vikings!

Arnor Lives! Plus of course some rambling...

With the weather (only slightly) curtailing my wanderings in the Great Outdoors, I have been back at my painting desk feverishly churning th...